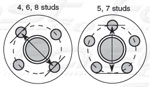
imaginary circle formed by the centers of the wheel studs.
Bolt patterns can be 4, 5, 6, 7 or 8 stud.
A bolt patternof 4 x 100 would indicate a 4 stud pattern with a bolt circle diameterof 100mm. The diagramsbelow show the correct way to measure thebolt pattern
5
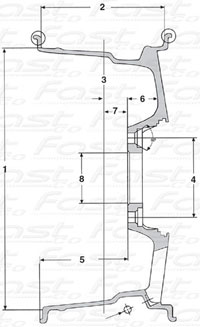
BACK SPACING
Backspacing is the distance from the hub mounting surface to the rear edge of the wheel rim. Backspacing decreases as the wheel offset becomes more negative.
6
X FACTOR
The X Factor is the distance from the hub mounting surface to the back of the wheel spokes. This cavity allows for brake caliper clearance.
7
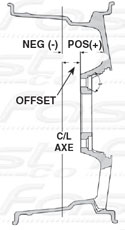
OFFSET
Offset is the distance from the hub mounting surface to the center line of the wheel. There are 3 types of offset.
Zero Offset
The hub mounting surface is even with the centerline of the wheel.
Positive Offset
The hub mounting surface is toward the front or street side of the wheel. Positive offset wheels are generally found on front wheel drive and newer rear wheel vehicles.
Negative Offset
The hub mounting surface is toward the back or brake side of the wheel. “Deepdish“ wheels are typically negative offset.
It is important to install wheels with the correct offset.
Vehicles with incorrect wheel offset may experience adverse handling and can be dangerous
8
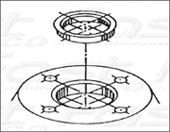
CENTER BORE DIAMETER
The center bore diameter is the size of the center hole at the back of the wheel. This hole centers the wheel on the hub of the car and is machined to match the wheel hub exactly. This design allows precise positioning which reduces the chance of vibration. With this hub-centric system, the lug hardware does not support the weight of the vehicle, but merely presses the wheel against the hub of the car.
Many car manufacturers' wheels have the same specifications with the exception of the center bore. Fast Wheels use a hub-centric ring system that lets you change the center bore of the wheel by using different size rings. This allows the same wheel to fit many vehicles.
MOUNTING & BALANCING
1
Before starting make sure you have the correct wheels, tires, rings, caps, nuts, bolts, locks and valves.
2
Test fit a wheel on both the front and rear of the vehicle, to make sure it fits the bolt pattern and center hub, BEFORE mounting the tires. WHEELS THAT HAVE BEEN MOUNTED ARE CONSIDERED USED AND CANNOT BE RETURNED. Make sure the wheel sits flat against the hub or brake drum. You may have to remove brake drum clips in some cases. Clean and check all studs, replace any stripped or broken ones.
3
Mount ONE wheel. Make sure there is enough fender and suspension clearance on both the front and rear of the vehicle before mounting the remaining tires.
4
Make sure the wheel is centered on the balancer from behind without the centering ring in place. DO NOT CENTER WHEEL FROM THE FRONT OR BY THE WHEEL NUTS.
5
A wheel / tire package may take excessive weight in some cases. This may happen when the heavy sides of both the wheel and tire align. You can reduce this weight by rotating the tire on the wheel, so that the heavy sides offset each other. Install stick-on weights to the inside of the wheel, or clip-on weights to the rear edge.
6
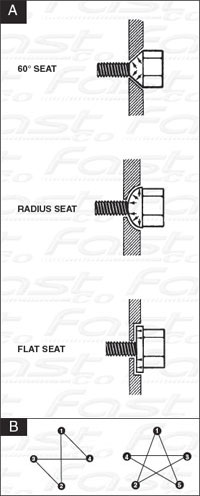
Make sure you use the correct hardware. There are three main types (see drawing A). Fast Wheels use 60° seat hardware only. If you are using the original nuts / bolts, make sure they have 60° seats. In some cases, factory hardware are radius seat, which looks similar but cannot be used.
7
Make sure that all nuts and bolts are threaded on by at least the diameter of the stud. Check that they have not bottomed out before they have tightened against the wheel.
8
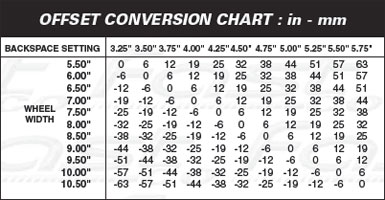
Do not use air or impact wrenches to tighten nuts or bolts, they cause threads to strip as well as under or over tightening. Hand apply all hardware to avoid cross threading, then tighten progressively in a criss-cross pattern, (see drawing B) to ensure uniform pressure and proper wheel aligment. Use a torque wrench and torque to the settings as shown in the chart below. Re-torque after 50 kilometers.